Deploy Action Mailbox To Postmark
In my recent Action Mailbox Post, I reviewed a ton of information on how Action Mailbox works and how you can use it. One very important topic I didn’t go over was how to deploy your Action Mailbox code to one of the default providers from Rails.
With that post covering a lot of detail, I wanted to separate out the instructions for deploying.
Rails provides a few different options for providers to handle your inbound emails. You’ll see these referred to as Ingresses or Ingress when referring to one.
The default options from Rails are
- Exim
- Mailgun
- Mandrill
- Postfix
- Postmark
- Qmail
- SendGrid
I’ve used Postmark quite a bit over the years for transactional email and have always had a good experience. It’s my default provider and the one we’re going to walk through in this post.
Before we get started, there are a couple of things you’ll need that will help your setup go smoother.
- A Postmark Account
- A domain to use for the mailer or a secure tunnel to your localhost like ngrok.
This post will assume your app is already deployed somewhere and won’t be covering deploying your Rails app. We’re only focusing on connecting Postmark for your inbound emails.
If you’re looking for some help deploying your app, I’ve been a long time customer of Hatchbox and can’t recommend them enough.
With your Action Mailbox app ready to go, let’s start adding the configuration needed for Postmark.
There isn’t a lot of code required for the Postmark setup so we can add some of the required code before configuring our mail servers in Postmark.
The first thing we need to is set our ingress for Action Mailbox in config/environments/production.rb
Setting the Ingress
# config/environments/production.rb
config.action_mailbox.ingress = :postmark
Generating and setting the ingress password
We also need to generate a password and set that value in our encrypted credentials or as an environment variable.
In your Rails console, we can use SecureRandom to generate a password for us.
SecureRandom.alphanumeric
=> "12312ddfgdfg"
Encrypted Credentials Side Note
Running bin/rails credentials:edit will open the main encrypted credentials file. All the credentials in this file will apply to all environments unless we have a specific environment file.
note: For VSCode you may need to run EDITOR="code --wait" bin/rails credentials:edit. If your using another editor besides VSCode and are seeing issues getting your encrypted credentials to open, swap EDITOR=code with whatever editor your using EDITOR=sublime
In other words, these credentials are going to apply to our development and production environment unless I created a credentials/development.yml (or whatever that is) file. Eventually you’ll probably want to separate that out with different settings for different environments. However, making the password available in our development environment is going to make it easier connecting this to our local environment with ngrok.
Add generated password to encrypted credentials
Now we’re done detouring into Rails encrypted credentials, we can the password we generated earlier to our credentials.
You’ll need to copy the output of that command and add it to our encrypted credentials.
I’m a huge fan of using Rails encrypted credentials but if you’d like to stick with using environment variables, you can use the RAILS_INBOUND_EMAIL_PASSWORD environment variable for your password.
Once your encrypted credentials are open add the following code with your generated password.
action_mailbox:
  ingress_password: 12312ddfgdfg
That’s pretty much it for the code changes we need to make. The rest of the setup and configuration is going to be on Postmark.
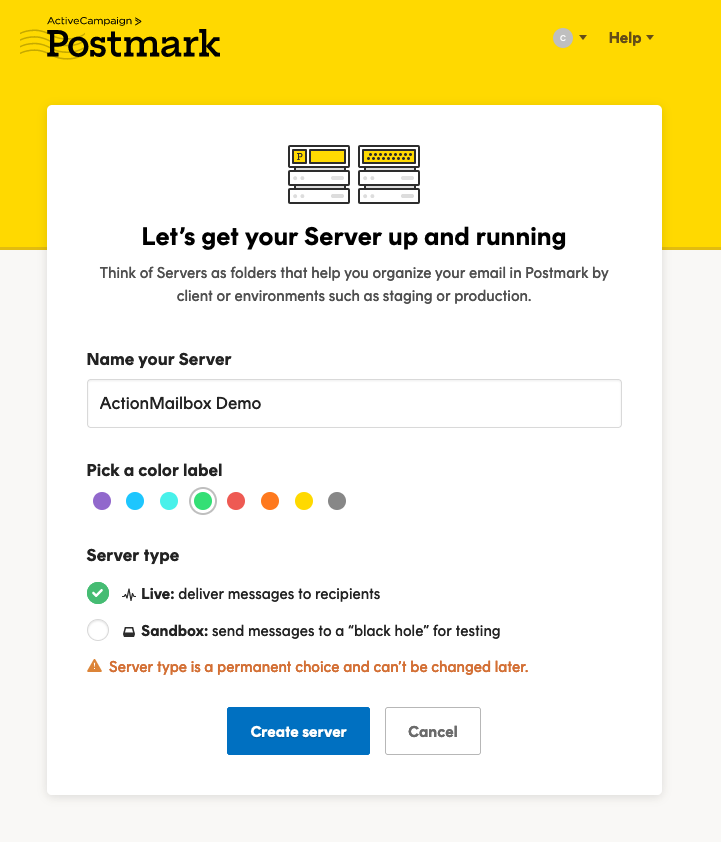
Creating A Postmark Server
If you haven’t already, create a new Postmark account and create a new ‘Server’
In Postmark, a server is a way to organize or group incoming or outgoing email. You can read more about Postmark Servers
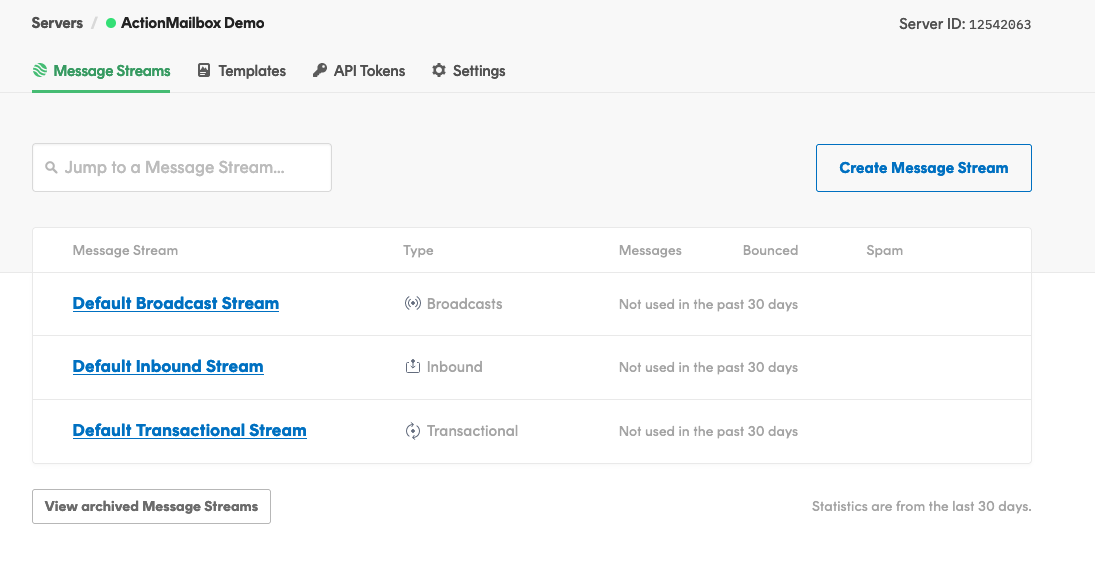
After creating the server, you’ll see 3 different ‘Streams’ listed on the dashboard.
To try to keep things consistent. I’ll be using the same terminology as Postmark does. A server is contains different types of ‘Streams’ which are used to send different types of email. Here’s how Postmark defines Streams:
Message Streams is how we separate different types of mail to ensure the highest deliverability for each. Pick the one that’s right for your email:
Transactional streams are for sending time-sensitive messages triggered for one recipient at a time. Broadcasts are for messages sent to many recipients at once, like marketing campaigns or newsletters. Inbound stream is a way for your application to receive email.
Your new Postmark server should have 3 different streams.
- Default Broadcast Stream (marketing emails)
- Default Inbound Stream (inbound email)
- Default Transactional Stream (transactional email from your app like password reset emails)
Configuring the Default Inbound Stream
For configuring our inbound emails, we’ll be using the Default Inbound Stream option.
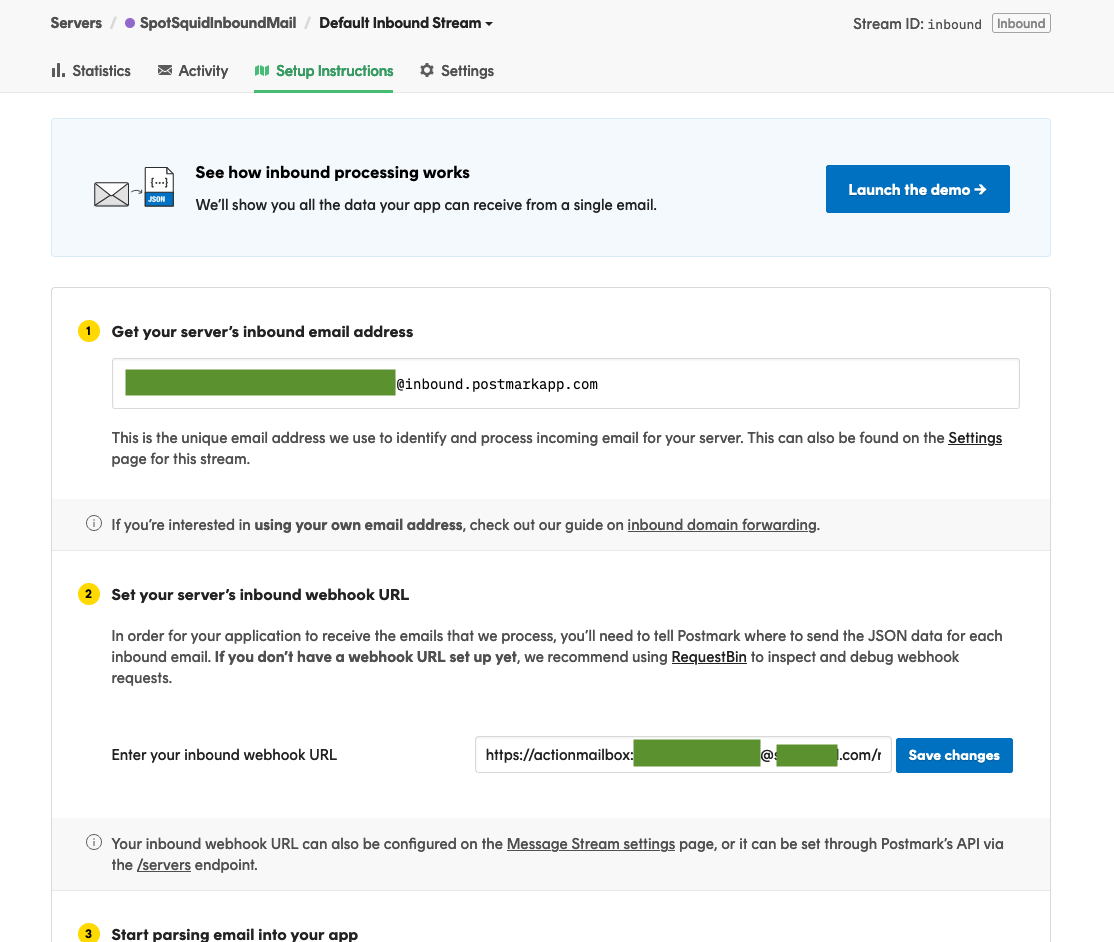
After first clicking on the Default Inbound Stream link, you should land on the ‘Setup Instructions’ page. Right at the top, you’ll see the option to get your servers inbound email address.
Setting up production email is fraught with peril. Well…maybe that’s being a tad dramatic but it can still be a bumpy ride.
Debugging and diagnosing production issues with email can feel like trying to look inside a black box that has another black box inside. In other words, there’s lot of small points of failure.
For this reason, in order to preserve my time and sanity as best as possible, I try to do a series of small checks along the way to make sure things are working as expected.
When I’m trying to resolve production issues, I’ll often start with focusing on things to rule-out to begin with. Performing some small checks along the way can give you a better idea of what things are working as intended and rule them out as possible causes.
Sending a Test Email
Just to make sure out Inbound Stream has been set up correctly and ready for use, we can fire off a quick email to the server’s inbound email address at the top-section. It should look something like this
123456e8b05e594a3a18129f293281469@inbound.postmarkapp.com
After sending your inbound email to the server, clicking on the ‘Activity’ tab for your inbound server should show the inbound email you just sent.
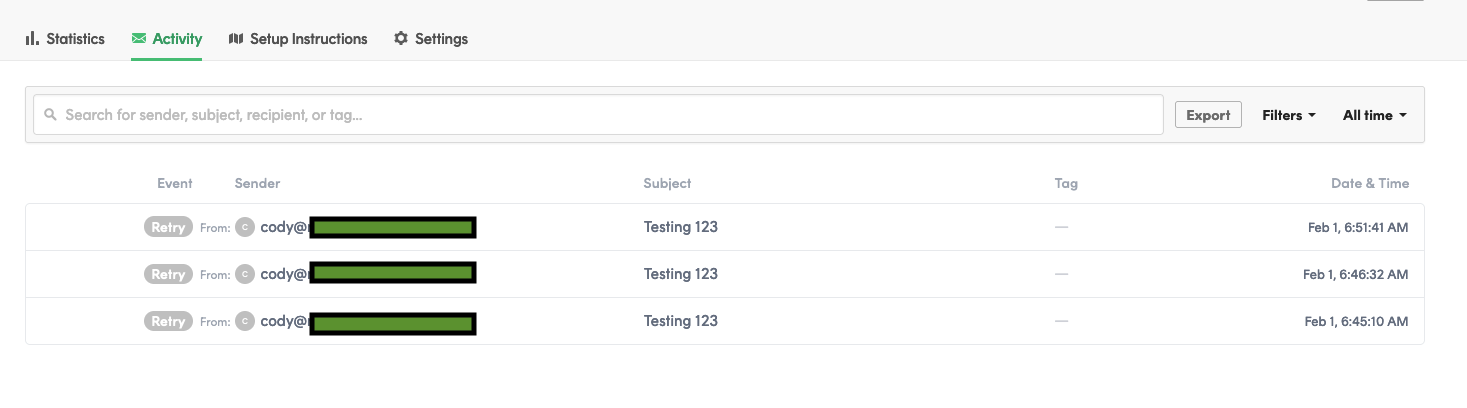
This lets us know that things should be configured correctly on the Postmark side and can move on to the next step.
Speaking of checking things along the way, now would be a good time to make sure these changes are deployed and checked to make sure the values are set.
Checking your credentials
Speaking of checking things along the way, now would be a good time to check if your changes adding the ingress_password have been deployed to your server. Missing or incorrect keys is very close to the top of my list for most common issues when setting up a new service.
A quick visit to our old friend the Rails console is all we need to confirm our password has been set.
Rails.application.credentials.action_mailbox
=> {ingress_password: 12312ddfgdfg}
Or if you set the value with an environment variable.
ENV["RAILS_INBOUND_EMAIL_PASSWORD"]
=> 12312ddfgdfg
Add Webhook URL to Postmark
With the password on the server, we need to setup an inbound webhook for Postmark. This inbound webhook is going to receive the incoming email and send the data to our postmark inbound email controller Action Mailbox provides for us.
If you’ve never seen this syntax for authentication in a URL like this I’m sure this looks weird but here’s how you structure your URL for the webhook to add to Postmark:
https://actionmailbox:PASSWORD@example.com/rails/action_mailbox/postmark/inbound_emails
This is using HTTP basic authentication with our username actionmailbox and password PASSWORD (the one we generated and added to the credentials) in the URL. This is how Rails confirms this is a valid request instead of being an open endpoint for requests.
The @example.com is the URL for our server, as in the URL for where your app is deployed (not postmark).
The final portion is the route that goes to the Action Mailbox controller for Postmark.
rails/action_mailbox/postmark/inbound_emails
We now have all the info we need to create our inbound webhook URL.
Click on the ‘Default Inbound Stream’ for your server and look for the section ‘Set your server’s inbound webhook URL’
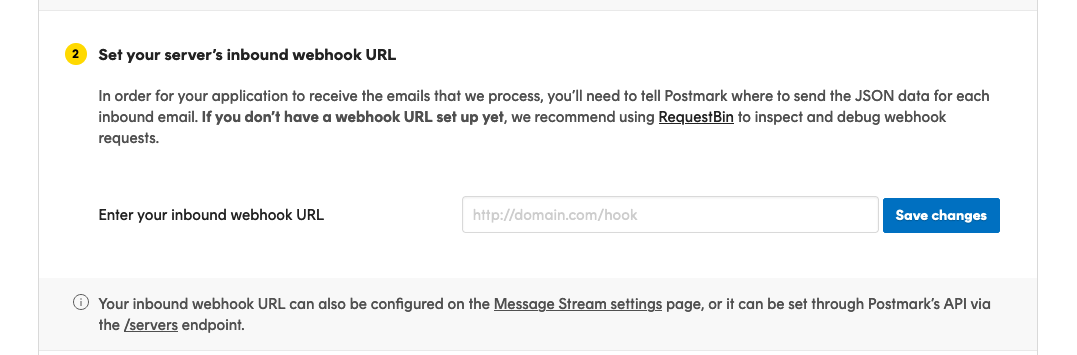
You could set up the inbound webhook URL on the ‘Setup Instructions’ page for the Inbound Stream, but there’s 1 small change we need to make that’s not visible on that page.
There’s a helpful little note in the Rails guides about including raw email content in the payload.
When configuring your Postmark inbound webhook, be sure to check the box labeled "Include raw email content in JSON payload". Action Mailbox needs the raw email content to work.
If you navigate to the ‘Settings’ section for your Inbound Stream, you’ll see a checkbox in the Webhook section that says ‘Include raw email content in JSON payload’
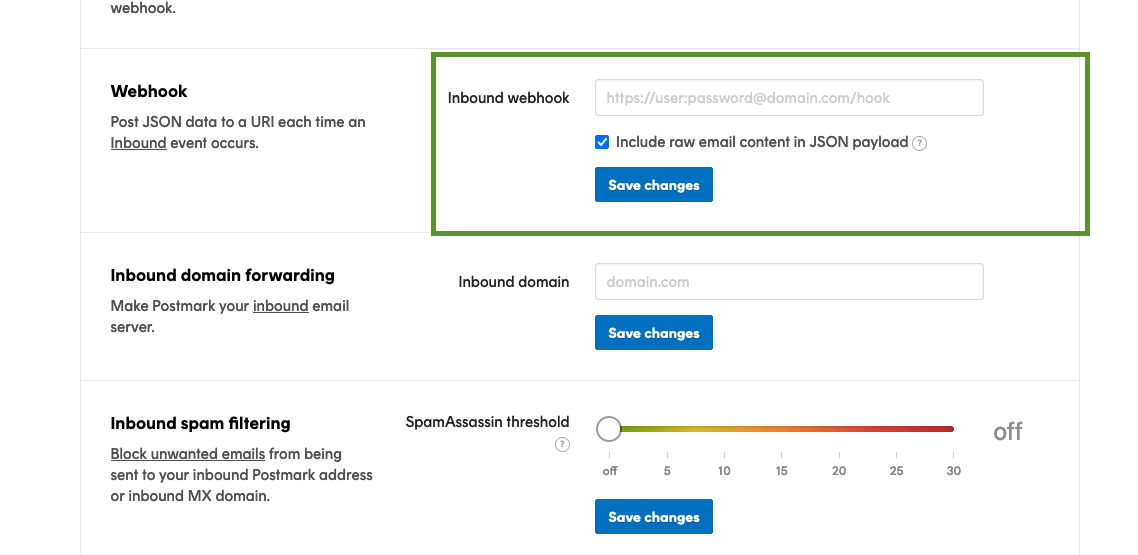
That’s what the Rails guides were referring to so make sure that option is checked.
With that option checked, add your webhook URL (https://actionmailbox:PASSWORD@example.com/rails/action_mailbox/postmark/inbound_emails) to the field.
Now we’re added new configs, it would be a good time to confirm they’re working.
Testing The Webhook URL
After saving your Inbound webhook URL, you should see a button to check the URL confirming Postmark can correctly send requests to your sever. Clicking on the button should show a loading state and if everything goes well, you’ll see:
Remote server returned an HTTP status code of 204
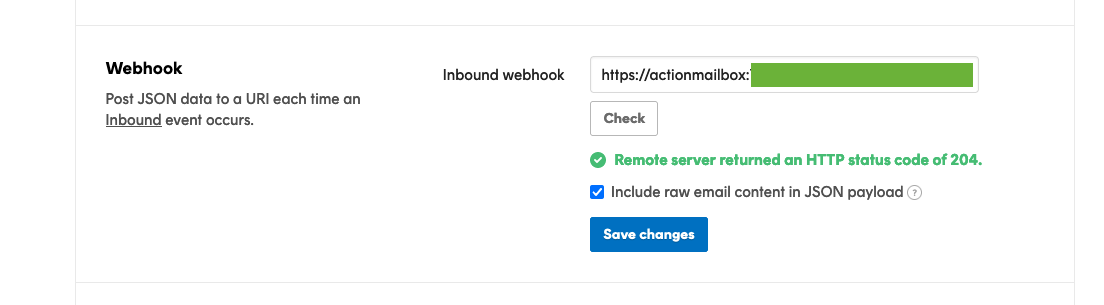
If you’re not seeing that, you know that there’s an issue connecting your Rails app and Postmark so gives you a good idea of where to look too (check your rails logs to see if the request is hitting your server and if so, if there’s anything obvious happening)
Seeing a successful request doesn’t necessarily mean everything is ready to go, just that Postmark is connecting with your app at the correct URL. This request should be visible in your server logs as well.
If your request fails, you’ll see an error message.
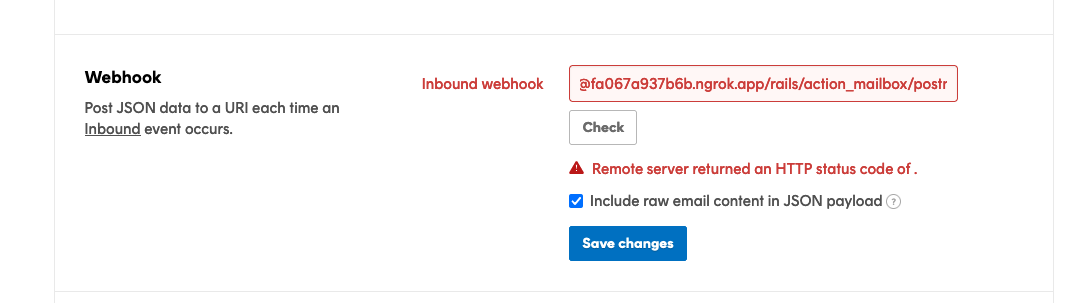
If you’re not getting a successful request to your webhook URL, checking your logs to see if the request hit your app and any errors that may have been raised afterwards is the first place to look.
Connecting a Domain
If you’d like to connect a domain you have to handle all your inbound mailers (hot tip: subdomains save a ton of headache) you can read more about that here
The short version is you need to create a MX record for your inbound email domain and set the value to inbound.postmarkapp.com
If I wanted to set up something like inbound.example.com as my inbound email URL, I would create a new DNS record, set the type to MX, add inbound in the Name section, set the priority 10 (from their docs) and the value to inbound.postmark.com

The screenshot illustrates adding the DNS record for example.yourdomain.com
After adding your DNS record, head back to the Inbound Stream settings page and add your inbound domain to the ‘Inbound domain forwarding’ section and click ‘Save Changes’
And Voila, now you have a production setup for your inbound email.
Testing and debugging locally
It’s pretty likely that at some point, you’ll have some issues you’d like to try to diagnose or re-create in your local environment.
Using ngrok or cloudflare’s secure tunnel service exposes your local development environment (localhost:3000) to a public URL. This is great for sending webhooks from a 3rd party service to your local environment.
I’ll be covering how to use a secure tunnel to debug mailer issues with ngrok.
Start ngrok with ngrok http 3000. In this case our local Rails app is running on localhost:3000.
Your screen should look something like this. Note the URL ngrok is making your app available on. There’s one change we’ll need to make to access our running app on this public URL.
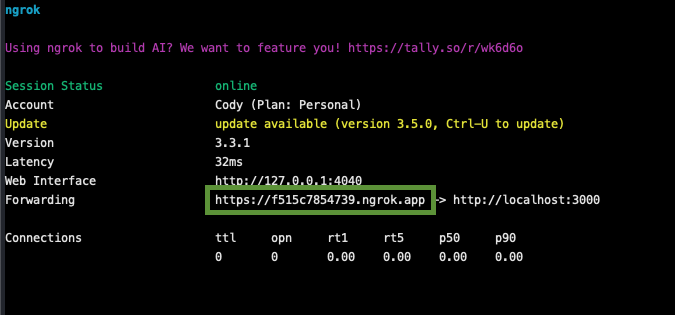
There are a couple of different variations of the ngrok URL (.io, .app, etc.) so make note of which one is being used.
We need to whitelist this host in our config/environments/development.rb file to tell Rails it’s ok to accept connections from this URL.
You can add your specific ngrok domain with: config.hosts << "f515c7854739.ngrok.app"
or if you would like to allow any domain to access localhost you set hosts to nil with config.hosts = nil. This can be handy when testing multi-tenant apps.
Without a premium ngrok account, your URL will be different each time. If you don’t want to update that URL each time you start ngrok, you can use a regex to whitelist _any ngrok domain.
 # config/environments/development.rb
  # whitelist ngrok domains.
  config.hosts << /[a-z0-9-]+\.ngrok\.app/
The other change for allowing Postmark to send email to your local environment is setting the ingress value in config/environments/development.rb.
# config/environments/development.rb
  # use ngrok and update postmark settings to test locally
  config.action_mailbox.ingress = :postmark
Re-start your server, paste your ngrok URL into your browser and make sure your app loads.
Update Postmark Settings for development
Swap your domain name for the ngrok domain in the webhook settings, it should look something like this:
https://actionmailbox:PASSWORD@f515c7854739.ngrok.app/rails/action_mailbox/postmark/inbound_emails
where f515c7854739.ngrok.app is the URL sending traffic to my local environment.
If we hit the ‘Check’ button, even without saving, that should check the URL to make sure it’s working. You should see a request from Postmark hit your local environment a couple seconds after clicking the button. If all goes well, you’ll see the green text saying Postmark received a 204 status code.
If it failed, hopefully it made it to your app and you’ll have more information in your local logs. If you don’t see anything in your Rails server logs, it’s most likely an issue with the webhook URL.
If your webhook URL returned an successful response, sending an email to the inbound email address for the Default Inbound Stream (123456e8b05e594a3a18129f293281469@inbound.postmarkapp.com) should forward that email to your local Rails app.
To confirm the email made it to Postmark, click on the ‘Activity’ section for the Default Inbound Stream and look for the email you just sent. The email should have a status like queued, retry or processed.
If everything is configured correctly, you should see some activity in your local server logs from Postmark at the corresponding controller:
Processing by ActionMailbox::Ingresses::Postmark::InboundEmailsController#create as JSON
Now we have these real emails being forwarded from Postmark to our local dev environment. This is a huge boost to your feedback loop and a great way to debug tough to re-create issues with inbound email.
Since this works more or less in the same manner as sending an email from the Rails Conductor, we can also do things like adding debugger to our process method inside a mailbox to access an interactive debugger with the data from the real inbound email.
Josh Smith has a great article walking through connecting a debugger to a Rails application if you’re not familiar with that process.
Thanks Josh!
Using Raw Source in development
If you’re unable or unwilling to get everything working with forwarding your emails to your local environment, you still have some options.
If you click on one of the inbound emails listed in your ‘Activity’ section of the Default Inbound Stream, you’ll see some additional information about the inbound email.
Clicking on the tab that says ‘Raw Source’ will display the source code of the email. If you remember from earlier, the Rails Conductor has the option to send an inbound email using the email source code. That’s the information contained in this ‘Raw Source’ section.
Copying that Raw Source and pasting that info into the input for the email by source option in the Rails Conductor should give you a pretty similar result.
Hopefully this gives you some additional tools and methods for debugging and inspecting your inbound emails.
Other Providers
If your intersted in seeing how this same process can be accomplished with Postfix or SendGrid Prabin Poudel has some great articles detailing that process.
Setup Action Mailbox with SendGrid
Setup Action Mailbox with Postfix
Final Thoughts
While these steps have been specific for Postmark, a lot of the same principles, including using a local tunnel like ngrok to send email to your local environment should be pretty similar.
Please let me know if you feel like I left anything out or when Postmark changes their UI making all of these screenshots and steps outdated.